If your network lacks a file server, it's missing a central hub for storage and backup. You could choose between several free and paid options, from Ubuntu Linux up to Windows Server. Here's how to get started with the free approach. You'll just have to scrounge up an old PC you probably have lying around already.
Download Ubuntu Server Visit the download page, and click the Server Edition tab. Download the current version, and burn the ISO file to a CD. Boot from that disc on your server hardware, and follow the 20-minute process to install the operating system. When finished, the OS will boot into a command-line prompt. Log in with your name, press Enter, and add your password. Enter the command sudo apt-get install ubuntu-desktop to unpack the graphical interface; the server edition normally only includes a command-line interface. After about 20 more minutes, you’ll be able to reboot and use the mouse as you would in the Desktop Edition.
Change IP settingsIf you're currently connecting to a DHCP router, Ubuntu will likely find its way online without trouble. When you're ready to start serving files, you'll likely want to manually configure the IP address so that clients can return easier. Visit System, Preferences, Network Configuration to make changes. Click the IPv4 Settings tab, and change the Method to Manual. Click Add to enter the basic IP data, and click OK. Use your router settings to either reserve that one static address and kee p sending DHCP setup to other clients, or set the whole network with manual IP addresses.
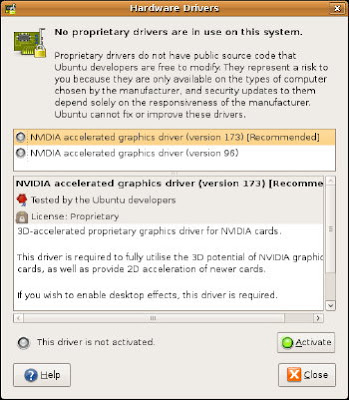
Update the driversWhen online, update the Ubuntu software and drivers. Choose System, Administration, Update Manager and System, Administration, Hardware Drivers to download updates. Restart if needed--likely if you update a video driver.
Add users
Download Ubuntu Server Visit the download page, and click the Server Edition tab. Download the current version, and burn the ISO file to a CD. Boot from that disc on your server hardware, and follow the 20-minute process to install the operating system. When finished, the OS will boot into a command-line prompt. Log in with your name, press Enter, and add your password. Enter the command sudo apt-get install ubuntu-desktop to unpack the graphical interface; the server edition normally only includes a command-line interface. After about 20 more minutes, you’ll be able to reboot and use the mouse as you would in the Desktop Edition.
Change IP settingsIf you're currently connecting to a DHCP router, Ubuntu will likely find its way online without trouble. When you're ready to start serving files, you'll likely want to manually configure the IP address so that clients can return easier. Visit System, Preferences, Network Configuration to make changes. Click the IPv4 Settings tab, and change the Method to Manual. Click Add to enter the basic IP data, and click OK. Use your router settings to either reserve that one static address and kee
 p sending DHCP setup to other clients, or set the whole network with manual IP addresses.
Update the driversWhen online, update the Ubuntu software and drivers. Choose System, Administration, Update Manager and System, Administration, Hardware Drivers to download updates. Restart if needed--likely if you update a video driver.
Add users
Add users within System, Administration, Users and Groups. Click Unlock, enter your password, and click Authenticate. Click Add User to add a new network login and password, and repeat for other people who need access to the server. If they don't need access to this computer, set the profile to Unprivileged, otherwise use Desktop user. Click Manage Groups and Add Group to combine all of the users who need server access.
Share files
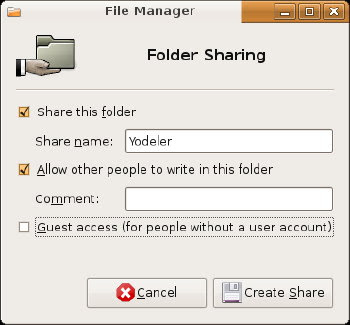
 Begin file sharing by choosing Places, Home Folder, and then locate or create a shared folder. Right-click the folder. Choose Sharing Options. Activate the shared folder, allow other people to write, and click Create Share. Add the permissions in the following window. Right-click the folder again to choose Properties. In the Permissions tab, pick the group who should be able to access the files, click Apply Permissions to Enclosed Files and Close.
Share files
 Begin file sharing by choosing Places, Home Folder, and then locate or create a shared folder. Right-click the folder. Choose Sharing Options. Activate the shared folder, allow other people to write, and click Create Share. Add the permissions in the following window. Right-click the folder again to choose Properties. In the Permissions tab, pick the group who should be able to access the files, click Apply Permissions to Enclosed Files and Close.
No comments:
Post a Comment